
GitHub 블로그 변경 사항
Github io 변경 사항
- Github blog를 만들면서 변경한 점 메모
Code Block 라인 줄 표시
수정 파일 - _config.yml
1
2
3
4
5
6
7
markdown: kramdown
kramdown:
...
  syntax_highlighter: rouge
  syntax_highlighter_opts:
    block:
        line_numbers: true
라인 줄 복사시 라인 번호도 같이 복사되는 현상 방지 수정 파일 - _sass/minimal-mistakes/_syntax.scss
1
2
3
4
5
6
7
8
9
10
11
12
13
14
15
16
17
/* line numbers*/
    &.gutter,
    &.rouge-gutter {
      padding-right: 1em;
      width: 1em;
      color: $base04;
      border-right: 1px solid $base04;
      text-align: right;
      // 라인이 복사되지 않게 한다.
      -webkit-touch-callout: none;
      -webkit-user-select: none;
      -khtml-user-select: none;
      -moz-user-select: none;
      -ms-user-select: none;
      user-select: none;
    }
Code Block Sytle 변경
수정 파일 - _sass/minimal-mistakes.scss 하단에 다음 코드 추가
1
2
3
...
@import "minimal-mistakes/code_style"
_sass/minimal-mistakes/ 폴더에 _code_style.scss 파일 추가
각 문법에 해당하는 코드를 추가 (예시 yaml)
1
2
3
4
5
6
7
8
9
10
11
12
13
14
15
16
17
18
19
20
21
22
23
24
25
26
27
28
29
30
31
32
$window-height: 16px;

.language-yaml {
  position: relative;
  margin-bottom: 1.5em;
  padding: calc(#{$window-height * 0.3} + 0em) 0em 0em;
  border: 1px solid $border-color;
  border-radius: $border-radius;
  box-shadow: 0 0.25em 1em rgba($text-color, 0.25); //base color
  background-color: $background-color; //base color

  &::before {
    content: "yaml";
    position: absolute;
    top: 0;
    left: 0;
    margin: 0;
    padding: 0 0;
    background: mix($background-color, #fff, 25%); //base color
    color: mix($text-color, #FFBF00, 50%); //base color
    font-size: ($window-height);
    line-height: 0;
    text-indent: (0.5 * $window-height);
  }

  .highlight {
    margin: 0;
    padding: 0;
    background-color: initial;
    color: #fff;
  }
}
Post 하단에 Date 정보 출력
수정 파일 - _config.yml
1
2
3
4
5
6
7
8
9
10
11
12
13
14
...
# Defaults
defaults:
  # _posts
  - scope:
      path: ""
      type: posts
    values:
      layout: single
      author_profile: true
      read_time: false # 이 부분을 false 수정
      show_date: true # 추가 부분
      share: true
      related: true
Post 하단의 last_modified_at 자동 업데이트
깃헙 블로그의 Post를 관리하는데 최종 수정일을 Post하단 부분에 표시를 남겨두고 싶음. 매번 post글 부분의 last_modified_at 부분을 수작업으로 수정하기 불편해서 Git의 pre-commit를 사용하여 자동적으로 업데이트하려고함.
pre-commit/Git Hook
Git의 pre-commit은 우리가 작성한 코드를 commit할 때 마다 자동적으로 특정 작업을 commit전에 실행해줌.
사용법
사용하려는 Git 프로젝트 폴더에 .git/hooks/pre-commit 파일을 추가하고 파일에 실행시킬 코드를 작성하면 commit전에 자동적으로 실행됨.
이 기능을 사용해서 .md 파일의 last_modified_at을 현재 시간으로 수정해서 파일을 수정하는 방법으로 업데이트 하려고함.
pre-commit code (Window 기준)
1
2
3
4
5
6
7
8
9
10
#!/bin/sh
# Contents of .git/hooks/pre-commit
# Replace `last_modified_at` timestamp with current time

git diff --cached --name-status | egrep -i "^(A|M).*\.(md)$" | while read a b; do
  cat "${b:0:-1}" | sed "^---.*/,/^---.*/s/^last_modified_at:.*$/last_modified_at: $(date -u "+%Y-%m-%dT%H:%M:%S" -d "+9 hours")/" > tmp
  mv tmp "${b:0:-1}"
  git add "${b:0:-1}"
done
1
2
3
4
> git diff --cached --name-status
M       _posts/Study/etc/2022-08-19-markdown-syntax-study.md
A       _sass/minimal-mistakes/_code_style.scss
...
여기서 게시글만 찾아서 수정하기 위해서 egrep을 사용하여 Git 파일의 상태가 A이거나 M이고 .md으로 끝나는 파일 목록만 출력한다.
1
2
3
> git diff --cached --name-status | egrep -i "^(A|M).*\.(md)$"
M       _posts/Study/etc/2022-08-19-markdown-syntax-study.md
...
출력받은 .md 파일 목록으로 while문을 통해 파일마다 last_modified_at 부분만 수정하면 된다. 이때 while read a b 로 목록을 받게 되면 a에는 git status b에는 파일이름이 들어간다. 그 파일을 cat $b 명령어로 열어서 text부분에서 sed 명령어를 통해 last_modified_at부분만 수정하면 된다.
1
2
3
4
5
6
7
8
9
10
11
12
13
14
15
> cat _posts/Study/etc/2022-08-19-markdown-syntax-study.md | sed -n "/^---.*/,/^---.*/p"
  ---
  title: "Markdown 작성 방법"
  categories:
    - etc
  tags:
    - markdown
    - html
  date: 2022-08-19-13:40:00
  toc: true
  toc_sticky: true
  toc_icon: "sticky-note"
  use_math: true
  last_modified_at: 2022-08-23T10:30:25
  ---
sed 명령어를 통해 깃헙 블로그의 정보가 들어가 있는 “—” 사이 부분의 범위만 출력
1
> sed "/^---.*/,/^---.*/s/^last_modified_at:.*$/last_modified_at: $(date -u "+%Y-%m-%dT%H:%M:%S" -d "+9 hours")/"
위 코드를 요약하면 “—” 사이 부분에서 “last_modified_at:”으로 시작하는 행(.*: 뒤에 문자열이 뭐가 오든 상관없음)을 last_modified_at: $(date -u “+%Y-%m-%dT%H:%M:%S” -d “+9 hours”) 문자열로 대체한다.
1
2
3
4
> date -u "+%Y-%m-%dT%H:%M:%S"                #GMT+0
  2022-08-23T15:36:48
> date -u "+%Y-%m-%dT%H:%M:%S" -d "+9 hours"  #GMT+9 한국 시간
  2022-08-24T00:37:13
포스트에 댓글 추가
github에서 Uttemaces App 설치 이후
single.html 에 다음과같은 코드를 추가하여 댓글 추가
1
2
3
4
5
6
7
8
9
10
11
12
13
14
...
<div class="page__comments">
  <h2 class="page__comments-title"> Leave a comment</h2>
  <h4>
    <script src="https://utteranc.es/client.js"
      repo="kimjiil/kimjiil.github.io"
      issue-term="pathname"
      theme="dark-blue"
      crossorigin="anonymous"
      async>
    </script>
  </h4>
</div>
...
[참고 블로그] https://www.hahwul.com/2020/08/08/jekyll-utterances/
사이트 검색 노출 설정
github.io root 폴더에 sitemap.xml 파일 추가
이후 https://search.google.com/search-console/about 에서 등록
[참고] https://eona1301.github.io/github_blog/GithubBlog-Search/
블로그 폰트 수정
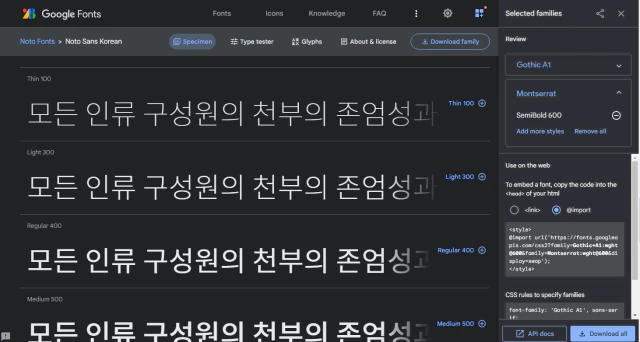
https://fonts.google.com/ 에서 마음에 드는 폰트를 선택후 위 그림 처럼 마음에 드는 옵션에 + 버튼을 눌러주면 오른쪽에 selected famillies에 장바구니 처럼 폰트가 담기게 된다. @import 부분에 있는 코드를 복사하여 /assets/css/main.scss 코드에 붙여 넣기 해주면 된다.
그리고 /_sass/minimal-mistakes/_variable.scss에 왼쪽부터 순서대로 적용되므로 가장 왼쪽 부분에 폰트의 이름을 추가하면 된다.
1
2
3
4
5
6
7
...
/* system typefaces */
$serif: Georgia, Times, serif !default;
$sans-serif: "Montserrat","Roboto Condensed", -apple-system, BlinkMacSystemFont, "Roboto", "Segoe UI", "Gamja Flower", "Jua", "Noto Sans Korean", "Gothic A1", "Inter",
  "Helvetica Neue", "Lucida Grande", Arial, sans-serif !default;
$monospace: Monaco, Consolas, "Lucida Console", monospace !default;
...
블로그 Header 폰트 색상 변경
/_sass/_base.scss 에서 header 부분은 h1,h2,h3,h4,h5,h6 부분에 color 속성을 추가하여 색상 코드를 추가함. 이제 귀찮게 header 부분에 <span style=”color: #ffd33d”`> 추가 안해도 됨.
1
2
3
4
5
6
7
8
9
10
11
12
13
14
...
h1,
h2,
h3,
h4,
h5,
h6 {
  margin: 2em 0 0.5em;
  line-height: 1.2;
  font-family: $header-font-family;
  font-weight: bold;
  color: #ffd33d;
}
...
Leave a comment